How to Use Liquid Nails for Stronger Bonding in Your Projects?

Time:2026-06-13 Author:Aria
0%

When it comes to creating strong and durable bonds in various projects, Liquid Nails stands out as a top choice. Expert Lisa Thompson, a renowned adhesive specialist, emphasizes, "Liquid Nails can transform the way we approach bonding." This powerful adhesive offers versatility, making it suitable for both indoor and outdoor applications.

The strength of Liquid Nails lies in its unique formulation, designed to hold up under pressure. This adhesive can tackle a variety of materials, from wood to metal. However, proper usage and application techniques are vital for optimal performance. Without attention to detail, even the best products can fall short.

Over time, some users may encounter challenges, like difficulties with curing or insufficient bonding strength. These issues often arise from improper surface preparation or incorrect application methods. It's crucial to address these variables to ensure success with Liquid Nails. Understanding how to use this adhesive effectively can make a significant difference in the outcome of your projects.

How to Use Liquid Nails for Stronger Bonding in Your Projects?

Understanding Liquid Nails: An Overview of Its Composition and Uses

Liquid Nails is a versatile adhesive designed for various construction and DIY projects. Its unique composition includes polymers and solvents that create a strong bond when cured. This type of adhesive is ideal for wood, metal, ceramic, and more. It provides flexibility while maintaining durability, making it suitable for both indoor and outdoor use.

When using Liquid Nails, preparation is key. Ensure the surfaces are clean and dry for optimal adhesion. Apply the adhesive evenly, and allow ample curing time for maximum strength. A common mistake is to underestimate the time needed for curing. Be patient; this step is crucial for a solid bond.

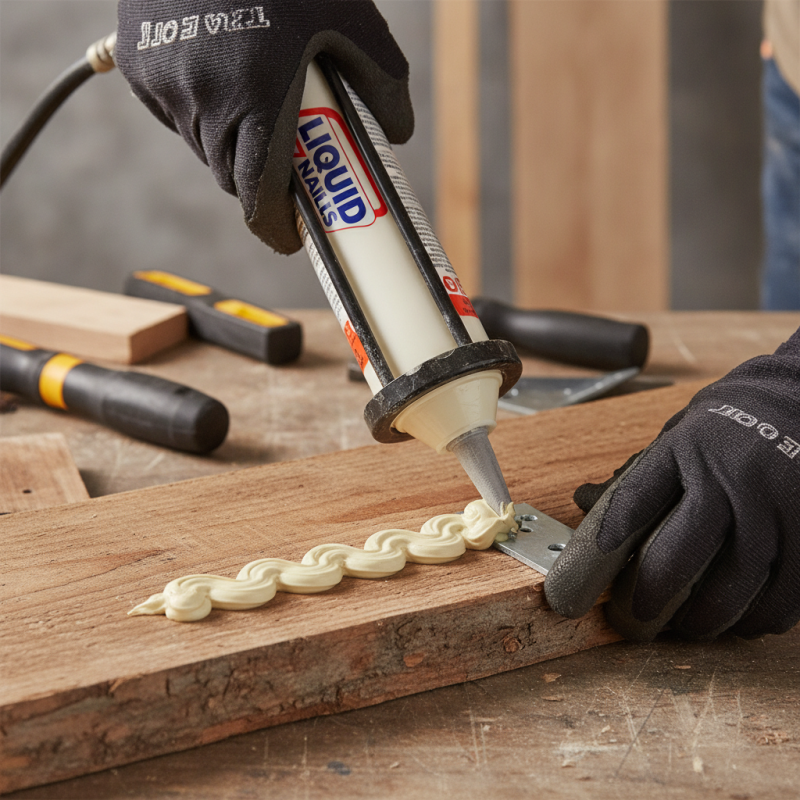
Tips for application: Work in a well-ventilated area to avoid strong fumes. Use a caulking gun for precise application. Clean any excess adhesive promptly; it can be difficult to remove once dried. Always check compatibility with your materials. Not all surfaces bond well, and some may require a primer. Remember, every project is a learning opportunity. Evaluate your application technique for next time.

Choosing the Right Liquid Nails Product for Your Specific Project Needs

When choosing the right liquid nails product, consider the materials you'll be working with. Wood, metal, and plastic require different formulations for optimal bonding. Each type has unique characteristics. For instance, wood adhesives often provide flexibility. Metals, on the other hand, need a strong, durable hold. Understanding these properties can guide your selection.

Application methods also differ. Some adhesives suit thicker applications, while others work best with thin layers. Knowing how to apply the product can make a substantial difference. Pay attention to the curing time. Some products bond within minutes, while others require hours. Patience is crucial here. Rushing the process may compromise the bond's strength.

It's easy to make mistakes during your project. One common issue is not preparing the surfaces correctly. Clean, dry surfaces enhance adhesion. Additionally, applying too much adhesive can lead to overflow. This residue often needs to be cleaned up, which can be frustrating. Reflecting on these challenges helps improve future projects. Each experience enhances your expertise and judgment.

How to Use Liquid Nails for Stronger Bonding in Your Projects

Preparing Surfaces for Optimal Bonding with Liquid Nails Adhesive

Preparing surfaces properly is crucial for strong bonding with Liquid Nails adhesive. Begin by cleaning the surfaces you intend to bond. Use a mild detergent to remove dirt and grease. Rinse thoroughly and allow them to dry completely. Any residue can impair adhesion. Wipe down the surfaces with a lint-free cloth for the best results.

Depending on the material, roughening the surfaces can enhance bonding. Sanding wood or using a wire brush on metal creates a better grip. Take care to remove dust after sanding. This step is sometimes overlooked, yet it can make a significant difference. For porous materials, consider applying a primer. This can reduce moisture absorption and improve adhesion.

Test the adhesive on a small section if unsure. Sometimes, despite best efforts, a bond may not form as expected. If that happens, don't hesitate to adjust your technique. Learning through trial and error is a part of any DIY project. Keep a journal of what works and what doesn’t. It can help you refine your approach for future projects.

How to Use Liquid Nails for Stronger Bonding in Your Projects?

Surface Type Preparation Method Optimal Drying Time Recommended Temperature Final Bond Strength
Wood Sanding and cleaning 24 hours 60-80°F High
Concrete Pressure washing 48 hours 50-90°F Very High
Metal Degreasing and scuffing 30 hours 60-85°F Medium
Plastic Cleaning with solvent 12 hours 65-90°F Medium-High
Glass Wiping with alcohol 24 hours 70-100°F Very High

Applying Liquid Nails: Techniques for a Strong and Durable Bond

Applying Liquid Nails effectively can make a difference in your projects. Start by ensuring that both surfaces are clean and dry. This step is crucial. Dust and moisture can weaken the bond. Use a cloth or brush to remove debris. For uneven surfaces, consider sanding them down for better adhesion.

When applying Liquid Nails, it's important to use the right technique. Squeeze the adhesive onto one surface in a zigzag pattern. This ensures even coverage. Remember to apply pressure when you join the surfaces. Holding them together for a few minutes can make a significant difference. If you're working with heavier materials, use clamps for added strength. Keeping an eye on drying times is also essential. The adhesive typically sets within 30 minutes, but full strength may take up to 24 hours.

While Liquid Nails is versatile, not all projects will go perfectly. You might find some areas that didn’t bond as well as expected. This can happen if too much adhesive is used or if surfaces aren't aligned properly. Taking the time to assess your initial attempts can lead to improvements for future projects. Be patient and learn from each experience.

Curing and Maintenance: Ensuring Longevity of Your Liquid Nails Bond

When using Liquid Nails, proper curing and maintenance are key to achieving a durable bond. After application, allow the adhesive to cure undisturbed for at least 24 hours. Temperature and humidity can greatly affect curing time. Ensure the area is well-ventilated to promote optimal drying conditions. Avoid touching or moving the bonded materials during this period.

For maintenance, inspect the bond regularly. If you notice any weakening, act quickly. Clean the surfaces thoroughly before attempting repairs. In some cases, reapplication may be necessary. Remember, while Liquid Nails offers a strong hold, improper usage can lead to failures. Each project is unique and may require adjustments. Don't be afraid to experiment and refine your technique. Learning from trial and error can lead to better results in the future.

FAQS

: Why is cleaning surfaces important before using Liquid Nails?

: Cleaning removes dirt and grease, ensuring a stronger bond. Any residue can weaken adhesion.

How can I improve adhesion on rough surfaces?

Sanding wood or using a wire brush on metal enhances grip, creating a better bond.

What should I do if I’m unsure about the adhesive's performance?

Test the adhesive on a small section first. Adjust your technique if the bond isn’t strong.

How should I apply Liquid Nails for best results?

Squeeze the adhesive in a zigzag pattern and apply pressure to the surfaces after joining them.

What can affect the curing time of Liquid Nails?

Temperature and humidity significantly influence curing. Ensure good ventilation during this period.

How often should I inspect the bond after application?

Regular inspection is important. If you notice weakness, clean and consider reapplication.

What should I do if my initial bond doesn't hold well?

Assess and adjust your technique. Learning from mistakes is essential in DIY projects.

How long should I avoid touching the bonded materials?

Allow at least 24 hours for the adhesive to cure undisturbed for optimal results.

Can I use Liquid Nails in all conditions?

Not all conditions are ideal. Poor alignment or excess adhesive can lead to bonding issues.

What if I need to make repairs later?

Clean surfaces well before reapplying adhesive to ensure a strong and durable bond.

Conclusion

Liquid Nails is a powerful adhesive that provides strong bonding for various projects. This article begins with an overview of Liquid Nails' composition and its diverse applications, highlighting its versatility. It emphasizes the importance of selecting the right product suited to your specific needs, ensuring effective adhesion for both DIY tasks and professional projects.

To achieve the best results with Liquid Nails, proper surface preparation is essential; contaminated or uneven surfaces can hinder the bonding process. The article outlines effective techniques for applying Liquid Nails to promote a durable bond. Finally, it addresses curing and maintenance practices to extend the lifespan of the bond, ensuring that projects remain intact and strong over time.

Aria

Aria

Aria is a dedicated marketing professional with a deep passion for innovative strategies and a keen understanding of our company's product offerings. With a wealth of experience in the industry, Aria excels at crafting engaging content that highlights the unique features and benefits of our......